
How to Pick a Pimple Safely
Share
As a teenager I used to pick my face constantly.
My skin was so bad that it became a bit of an evening ritual.
Unfortunately, I had no idea how to extract my skin properly and my OCD extractions left me with broken skin and a few scars - war wounds I still have today.
Many skin experts tell you that you should never pick you skin, "leave it to the professionals" they say.
I agree. But when you're so emotional about your blemishes/blackheads/any bump on your face, you aren't thinking straight.
Instead you can get so fixated on "getting 'er outta there" that you hurt and damage your skin.
I am also a realist.
I know that people pick their faces - especially Pitta people who expect perfection of their complexions.
So, here is my step-by-step guide to extracting your skin safely.
Hopefully I can save you some of the grief and skin marks that I caused myself (scabs are mighty hard to cover up).
How to Pick a Pimple Safely
Step 1: Assess Whether the Blemish is Ready
A blemish is ready when it's raised off the skin and looks like it's ready to burst.
If it still looks dry (not "juicy"), it's not ready yet. If a whitehead has turned yellow, it's too late to safely pick your own skin (an esthetician may still be able to).
If there is no whitehead, this cannot be picked.
If it's a cyst - a hard, painful blemish that is underneath the skin, I would leave it to a professional who can prick it (with a sterile instrument) and extract it or I would try to drain it with arnica.
A good sign that a pimple is ready is when the whitehead area is larger than the red area that surrounds it. If it's a tiny whitehead on a big reddened pimple, there's a good chance it's still not ready.
Remember, professional estheticians can better assess this, as well as pick pimples even outside the above criteria, so it may make sense to get one to do this.
Blackheads are not as particular, you can almost always give extracting comedones a try.
Step 2: Cleanse
This may sound like a given, but I've heard this question a few too many times for comfort. "Should I wash my face first?"
Yes.
You need to start with a clean slate - and you don't want to be pushing surface bacteria into your pores.
Cleanse, always cleanse. To be honest, when in doubt whether or not to wash your face before a skin treatment, just do it.
I've been asked many times if you should cleanse before exfoliation too - and ditto to this.
Step 3: Steam
Steaming is imperative to properly extracting your skin. The steps to do this are here. If you are picking blackheads, ideally you exfoliate before steaming - but if you are picking a blemish with a white head on it, don't.
Steaming your skin will soften your pores and make your skin more supple. Flexibility is important when extracting because dehydrated, brittle skin will break and tear more easily.
The heat and hydration will also make the area more moist and "juicy", helping your black heads, white heads come out more easily and also more fully.
If you don't steam, you often won't get the whole whitehead and it will simply reappear the next day. Also, if you don't steam, you have a much higher risk of scarring.
If you don't want to do the outlined steam ritual, then at least pick your face after being in a warm shower...that will steam your skin indirectly.
Step 4: Get Out the Tissue
Wrap each of your pointer fingers with tissue. This creates a barrier between your skin and nails (you have dirt and bacteria under your nails that you don't want in your open skin).
Also, it pads your nails so you are less likely to leave nail marks on your face (something I've done even with tissue).
Another helpful note: trim your nails as short as possible beforehand, this too will prevent them from cutting into your skin.
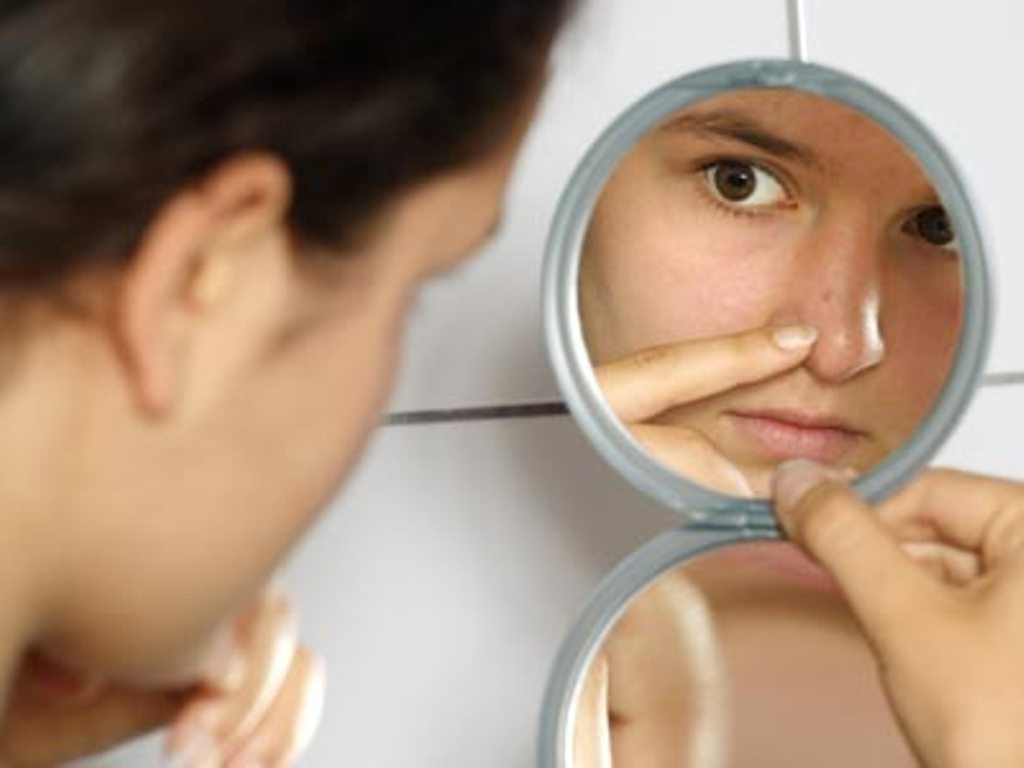
Step 5: Extract!
Now it's time for the nitty gritty.
Get in really close to the blemish or black head with one finger on either side of it. The closer you are, the more precision you will have.
Your fingers also should be equal distance away from the blemish. If one finger is far away from the side of the blemish, while the other is close, you'll also lack precision.
Now this is important: When you extract, you want to be doing an upward scooping motion - like you are picking the blemish up from the bottom and extracting it out.
You don't want to just push down because you will push the bacteria deeper into your skin, creating a bigger pimple that is embedded into your skin. You're pinching it out, not digging it out.
When I train estheticians to extract, I tell them that if they are pushing their client's head into the table/bed, they're doing it wrong.
This emphasizes that you should not be pushing down and you should not be pushing so hard that you are pushing down on the face. That's a recipe for a scar.
Some estheticians benefit from a rolling motion to prevent this; they wiggle their fingers back and forth, slowly coaxing the pus out of a blemish.
I do this sometimes, but I want to work fast before the pores close up again after the steam and find this technique loses time. It's best on stubborn pimples that won't come out easily.
Blackheads are much easier to extract than pustules, so I would advise starting with extracting comedones before delving into the world of extracting whiteheads. This will give you practice without the risk of infecting your face.
Another important note: If you see nail indentations on the skin, stop and move on. You can come back to it later, but you don't want to wound your skin, so leave the sensitized area alone.
Also, don't keep picking at it. Push it out twice maximum, then move on and come back if need be. Staying in one spot and re-picking areas just causes redness and possible scarring.
Step 6: Disinfect
Always, always disinfect the extracted area afterwards. As soon as you can.
Cotton swab it with organic witch hazel, mint or pine hydrosol. These purify the skin without drying it out.
When I was a teen, I used hydrogen peroxide and this irritated my face and impeded wound-healing.
Dehydrating or stripping your skin after wounding it will lead to more inflammation, hence the scar. Some pros believe in dry skin healing...but I don't agree. The new research says wet wound healing is best...and that's what I've seen with my own eyes.
Dehydrated skin also does not repair well, so using alcohol and other chemical drying agents will also hinder your skin's ability to bounce back from this trauma.
Step 7: Clay & Moisturizer
If your blemish is weeping or looks open, I recommend putting some clay on it. This will close the pore and calm down redness.
If it's a moist clay (usually mixed with moisturizing ingredients), you can leave it on as a spot treatment overnight. I don't particularly like pink clays or kaolin for this... I prefer green, black and dead sea muds.
But if it's a dry clay (powdered clay that is mixed with water - or has the dry texture of a paste, I would wash it off after 15-20 minutes (when it dry to touch). It will probably dry to an ash texture that will crumble off anyway.
Then I would finish by applying a moisturizer.
As I said before, dehydrated skin does not repair well, so moisture is important. Hydration helps heal wounds and it will also decrease inflammation.
Now you know how to extract your skin properly if you choose to do so. But as you can see, there are many things to consider and many variables of risk.
So, if it's daunting or overwhelming, you can do as the experts advise - hire a pro, someone who extracts people's skin day in and day out.
A bit of patience can be worth it in the long run.